Monday, August 31, 2009

Next three pages of the September Banner


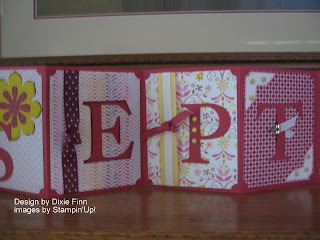
Good morning. Here are the E, P, and T pages of the banner. I used Razzleberry Lemonade and Rose Red Designer Papers. For the E I used the new Rich Razzleberry In-Color dotted ribbon. I sponged the edges with Soft Suede. The P has 3 So Saffron brads and the ribbon is retired So Saffron 5/8" grosgrain with 1/4" white snailed down the middle. It is tied with Rose Red 1/4" grosgrain. The T has whisper White 1/4" grosgrain clipped to it with a silver mini Library clip. The photo corner punch was used with whisper white and so saffron brads were used. The edges were sponged with Rose Red. Enjoy!

Sunday, August 30, 2009

First two pages of September Banner


Good morning. As promised I have close ups of the September Banner. The first page used the retired Elementary Essentials. I just love the scissors and pencil. The Scissors were stamped in Rose Red Classic Ink and the pencil was stamped in the fabulous new In-Color Crushed Curry. The letters for the banner were cut out of Rose Red with the Serif Essentials Big Shot Dies. The flowers behind the letter S are from the Stampin'Up! Blossom Party die. I used Crushed Curry for the large flower and Rose Red Designer paper for the smaller one. All the designer layers, except for the first page were cut with the Ticket Corner Punch. If you are interested in any of these products please call or email and I will be very happy to help. Enjoy!

Saturday, August 29, 2009

September Banner


Good evening. You know how much I love love these banners. Here is the one for September. I love the colors (Rose Red, Rose Red Designer Paper, Razzleberry Lemonage Designer Paper) and it looks so wonderful on my mantle. The school bus is from a Stampin'UP! set from many many years ago. I will show close-ups the next few days. Enjoy!

Tuesday, August 25, 2009

Something for you to enjoy


Good evening. Several of the ladies over at StampinAddicts were talking about this really cute bag. It says it all. How cute would this be to carry for a workshop. It came from Walmart. I will not be posting again until Saturday. Enjoy!

Monday, August 24, 2009

Early Halloween


Good afternoon. I wanted to show you a picture of a candy jar with our wonderful Decor Elements. What a quick and easy table centerpiece. My jar came from WalMart. I have two of these, one on my desk at school. Let me know if I can order one for you and help you apply it to your candy jar. That's my kitty Bailey...snubbing me cause she wasn't the center of attention. Enjoy!

Sunday, August 23, 2009

One more week only!


Good morning. The wonderful offer Stampin'Up! is offering will expire on August 31st. That offer is to join this fantastic company for only $85. I would love to have you join my Stampfinn's group and this is a great way to do it. You can call or email me or you can go to my Stampin'Up! website and sign up online. Above is the picture of everything you will receive for your $85. Hope to hear from you today. Enjoy!

Saturday, August 22, 2009

StampinAddicts rock the gallery

Good morning. This weekend StampinAddicts is having a "Rock the Gallery" weekend. Hundreds of new uploads, fantastic pictures, super ideas. I am very excited about it and think you need to take a look. Enjoy!

Friday, August 21, 2009

And now the star of our show

Good morning. Today we talk about the fabulous stamps Stampin'Up! has created. Our stamps come unmounted with the picture "sticker" and the wooden blocks. They are die cut so all you do is peel and press. This gives you the decision on where to mount it on the block. Some people like to put them in the middle, others like me like to put them on the right side. It helps me know where to stamp. But I love that I have the choice. The rubber is the highest quality I've seen and you don't have to pound the stamp into the stamp pad and then use all your weight to press onto the cardstock. It's a press and lift. So easy. This post concludes our Stampin 101 class. Call or email if you have any questions. dixiefinn@neo.rr.com

Again I want to send you to StampinAddicts for fantastic videos, discussions, and a fabulous gallery.

Enjoy!

Thursday, August 20, 2009

Ink and Markers

Good afternoon. I want to talk about our (Stampin'Up!) stamp pads and markers. Our stamp pads come in the same 48 colors as our cardstock and markers. Our stamp pads are designed to always have the ink on the top of the pad. We also have reinkers to re-juice your pads. You do not need to pound on our stamp pads. Just stamp up and down and look to make sure your stamp has covered. Our markers are the same 48 colors and can be used to color in your image, or apply directly to the rubber. Such high quality products. Enjoy!

Wednesday, August 19, 2009

No post tonight

Good evening. It's 6:00 and I just got home from the first teacher in service day at school. I am exhausted and cannot get my thoughts in order. I will be posting about this time each night unless I can get some things together and set them to post in the morning. I plan on talking about our inks, markers, and chalks tomorrow night. Enjoy!

Tuesday, August 18, 2009

Beginning paper supplies

Good morning. Yesterday I gave you suggestions for a beginners kit to begin making cards. They are also good supplies for scrapbooking. Our paper cutter handles paper that is 12" x 12".

Today I want to talk about paper products that also work for both card making and scrapbooking. You need to begin with a package of Whisper White cardstock. (100730). There are 40 sheets in this package. You then would need a variety of colored cardstock. Stampin'Up! has 4 color families and each color family has 12 colors in it for a total of 48 fabulous shades of cardstock. These color families can be bought in a package of 36 sheets of cardstock, 3 sheets of each color.After basic color cardstock a package of Designer Series Paper would complete your basic paper needs. With these products you can make multiple designs for cards and scrapbook pages.

Tomorrow I will discuss the embellishments to finish your projects. The first one being wonderful stamps.

Remember, glide on over to StampinAddicts to check out the gallery for great ideas. If you choose to case (copy) a card or page posted there give full credit to the designer of the project. Enjoy

Monday, August 17, 2009

Basic stampin kit

Good morning.

Today's post is the beginning stamping basic kit. At least for what I tell my ladies. You need a cutter with a sharp blade. Our paper cutter (104152) is a wonderful way to begin. It comes with 2 cutting blades. You also need a scoring blade. The cutting blade is orange and the scoring blade is black. I use two cutters, makes it easier not to cut when I mean to score. You also need a bone folder (102300), a great pair of scissors (103579), and adhesive (104332). Those are the basic items you need to begin stamping. Tomorrow I will talk about the paper products.

A great place to find projects is StampinAddicts. The gallery is full of cards, scrapbook pages, and 3-d projects. There are challenges for every level of crafter.

Enjoy!

Sunday, August 16, 2009

Happy Sunday

Good afternoon. I don't have a post today. I've had a nasty headache and can't think. I am planning on posting informational posts next week using our many products. I will begin with a Stamping 101. How do you begin, what are the basic supplies you need to get started (beside signing up and getting the I want it all Kit). That sort of thing. See you tomorrow.

Saturday, August 15, 2009

Card four for the Keeper Box


Good morning. Here is the last card we made to go inside the Forget-Me-Not-Keeper box. Each card by itself is a fantastic gift for someone.

Just a reminder - Stampin'Up!'s special demo special of $85 is only available until August 31st. And I will include $25 in additional products. Call or email today.

There are still 3 openings in the second round of the In-color club. Let me know.

I only have a few evenings open for your in home workshop. Don't be left out.

Enjoy!

Friday, August 14, 2009

Card three for the Keeper box


Good morning,

This is the third card we created for the Forget-me-not Keeper. Enjoy!

Thursday, August 13, 2009

Card two for the Keeper box


Good morning,

Just finished another keeper class and as usual the gal did a fantastic job. This is the second of 4 cards we made. This class is so easy. Same colors, Razzleberry Lemonade designer paper and the new incolors. Love them! Enjoy!

Wednesday, August 12, 2009

Card from the Keeper Box


Good afternoon. Blogger was cranky this morning and I could not post. Here is one of the 4 cards we made with our keeper box yesterday. I've added another class on Thursday at 10am. I have 3 spots left. Call now to reserve your spot. For $15 you decorate the Forget-Me-Not card box and 4 cards.

I am begging all my stampers to schedule an in home workshop. I really really want to earn the cruise to Alaska in May 2011. Call or email today with your date.

Enjoy the card!

Tuesday, August 11, 2009

Forget-Me-Not Keeper


Good morning. Today we completed the Forget Me Not Keeper and four cards. I got the idea from CIAF. We used the Forget Me Not Keeper (105525) and the new in-colors (Melon Mambo, Crushed Curry, and Rich Razzleberry. Razzleberry Lemonade designer paper completed the cards. The ladies that attended my class, and the one tonight, will be able to purchase another keeper for 20% off. This mornings group had so much fun, I'm sure we will enjoy tonight's class also. Enjoy.

Monday, August 10, 2009

Limited time $85 demo sign up

Good morning. For a limited time, until August 31st, you can sign up as a Stampin'Up! demonstrator for $85.00. This is a modified kit and the information can be found on the button on the right. As an added incentive to sign up I will add a $25 gift certificate for additional Stampin'Up! product. This offer is only available from me. Call or email today. I would love to have you as a downline and have everyone meet you at the downline meeting in September. Don't live near me, no problem. I can send you all the discussions and have you participate in all the swaps we do. I hope to here from you soon. Enjoy!

Sunday, August 9, 2009

Envelope Scrapbook Swap


Another swap I participated in for Convention was a mini album swap. I chose to make the Envelope Scrapbook. I used the tutorial I found on InkingAddict. Her name is Paula Goff and her directions were so easy to follow. I used the new Razzleberry Lemonade Designer Paper and the base color is Melon Mambo. Enjoy!

Saturday, August 8, 2009

No Flowers Swap


Good morning. Jen at StampinAddicts hosted a no flowers swap at convention. I didn't go to convention, but was able to participate because of my wonderful convention buddy, JEN! I chose to case the card at the top of page 62 in our fabulous idea book & catalog.

The supplies used are: Cheers to you Stamp Set, Bermuda Bay, Certainly Celery, Confetti White, Kraft, More Mustard, and Real Red card stock. Chocolate Chip textured card stock, Chocolate Chip Craft Stampin' Pad, VersaMark pad, Clear Stampin' Emboss powder, Chocolate Chip 5/8" grosgrain ribbon, Silver brads, Stampin' Dimensionals, 1 3/8 circle punch.

Our catalog is full of wonderful samples. Enjoy!

Friday, August 7, 2009

Convention Swap


Good morning. Stampin'Up!s convention is going into it's second day today. Even though I'm not there I'm still swapping (giving one card to someone and getting one of theirs in return) This is how I get most of the samples for my classes. I was in a cards that move swap and this is mine. It is a waterfall card and my very favorite. I used basic black cardstock, ran it thru the textured Big Shot plate. The background cardstock is Real Red. I stamped it with the Circle Circus stamp set and embossed it with gold. So out of my comfort zone but I really love the outcome. Enjoy!

Thursday, August 6, 2009

Box to hold my embosslets


Good morning. This is a really cute little box to hold all the small embosslits from the Stampin'Up! catty. They make the perfect embellishment for any project. I found the directions for this box while blog hopping and cannot find them again. If this was your design, please let me know so I can give you the credit. Enjoy!

ETA: Box for Big Shot 2-1/2” Dies
Tutorial
Created by Susie Nelson, 2/2009

Wednesday, August 5, 2009

An awwww picture


Good morning. While waiting for wonderful news from Convention, I thought I would give you an awwww picture. This is my kitty Bailey. She is always where I am. This is her relaxing while I'm on the laptop. I'll have more projects this week. Enjoy!

Tuesday, August 4, 2009

Another Birthday Card


Good morning. Here is another wonderful birthday card. It was given to me by my wonderful friend Monica. You see her picture further down in my open house post. I love the colors she used. Just a great card. MANY of my fellow stampers are either in Salt Lake City or on their way. I hope everyone has a wonderful time at Convention and learns and shares so many wonderful techniques or projects. Enjoy!

Monday, August 3, 2009

Same card different effect


This is one of the cards made at my open house and at a workshop. It is a great card, cased from Patty Bennett. After I returned home from taking JanTInk's class I tried it again with sponging. Jan sponges everything. Well, I love the card with the sponging added. Yes it is an additional step and would not work well in a workshop, but I just love it and can't wait to teach it in a class. I am teaching Stampin'Up!s birthday calendar tomorrow and still have 2 spots open. Call or email your reservation. Enjoy!

Sunday, August 2, 2009

Fourth and final JanTInk project


Here is the fourth fantastic project I made in JanTInk's class. It was so much fun and she is truly a fantastic lady. I learned a new (old) technique and will show you tomorrow how it changed a card I've shown before. Really like the new look. Enjoy!

Supplies: (all SU!) Stamps - Flight of the Butterfly; Paper - Cottage Wall DSP, Orchid Opulence, Rich Razzleberry, Old Olive; Ink - Rich Razzleberry, Old Olive; Other - Eyelet Border punch, Old Olive 1/4" grosgrain, gold brad, white gel pen, paper piercing tool, Rich Razzleberry dotted grosgrain, SU! Beautiful Butterflies Bigz die

Saturday, August 1, 2009

Cute Tissue Box


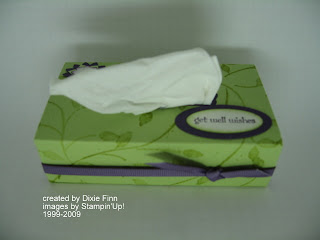
Here is the third project I completed with JanTInk. It is a fabulous gift for a shower or for wedding favors. The tissues are kept in place with a small strip of Snail. You can buy these tissues packs in quanities at the dollar store and get them to match your color choices. Enjoy!

Supplies: (all SU!) Stamps - Friendly Words Jumbo Wheel, Teeny Tiny Wishes; Paper - Certainly Celery, Elegant Eggplant, Confetti White; Ink - Old Olive, Elegant Eggplant, Certainly Celery; Other - Small & Large Oval punches, Boho Blossoms punch, Modern Label punch, Elegant Eggplant 1/4" grosgrain, Movers & Shapers with Movers & Shapers Punch Windows set.

LinkWithin

Related Posts with Thumbnails